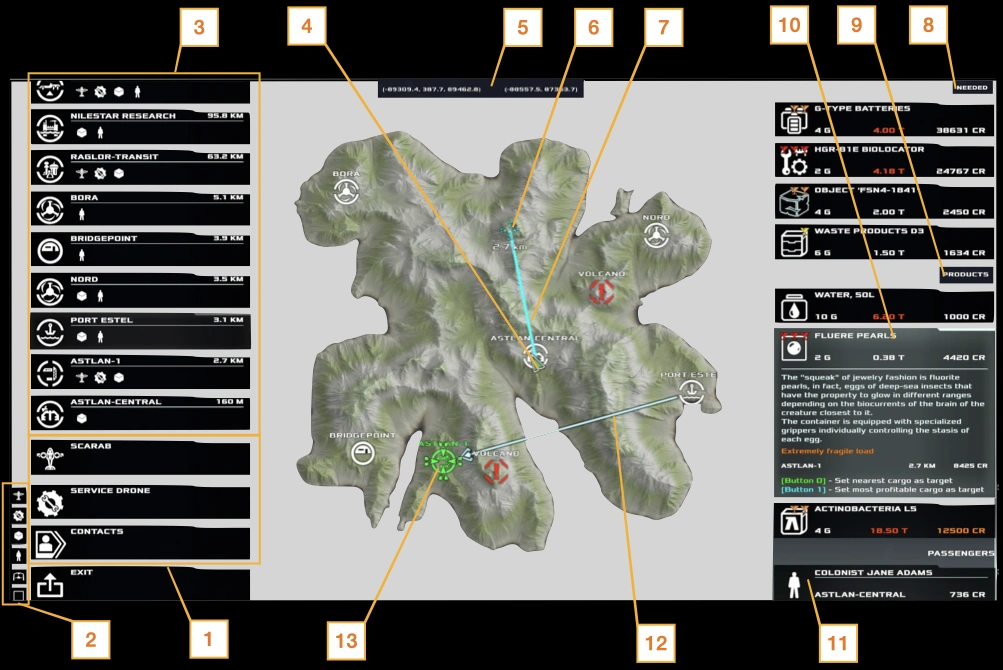
The Map interface is where you find cargo and passengers to haul. You can flip the Map interface between two different modes, “Trade” and “Contacts.” The “Trade” mode is shown below:
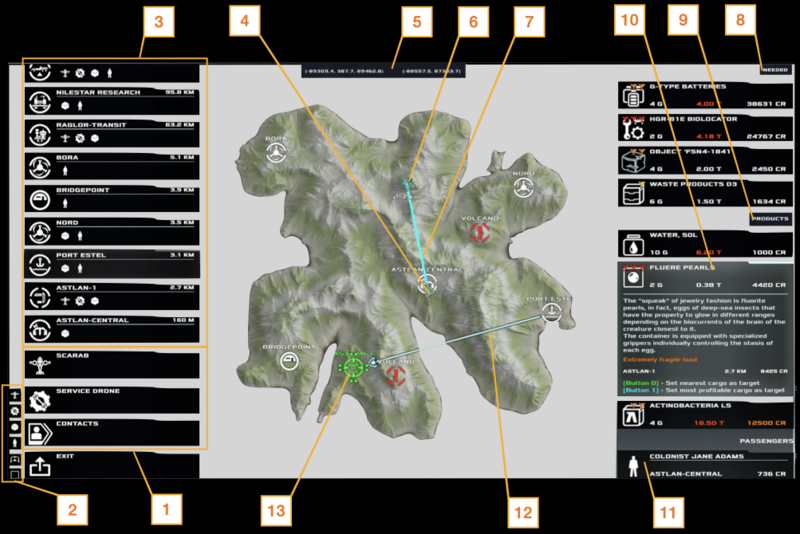
| 1. Map Services – Switches the display between Map/Trade mode and Contacts mode, and allows calling of a Service Drone. 2. Base Filters – Filters the display of Bases depending on those which offer (top to bottom) aircraft purchase; aircraft repair/upgrades; cargo; passengers; TODO: unknown; and TODO: unknown. 3. Bases – A list of all airbases that match the filter criteria from above. Selecting a base will make its detail appear on the right side of the screen. 4. Player Position – The player’s aircraft. 5. Cursor Coordinates – Map coordinates under the mouse cursor. 6. Waypoint – Clicking the map can create a user waypoint which will show on the map and in the HUD MiniMap (see Flight – Instruments). 7. Route Line – You can create a route by creating multiple waypoint. They will be joined by a line on this map. The HUD MiniMap displays the next waypoint in the route until it is overflown, then automatically sequences the next waypoint. | 8. Base Detail, Needs – When a Base is selected, this section shows products (cargo) the base wishes to buy, and the offered purchase price. 9. Base Detail, Offerings – When a Base is selected, displays products (cargo) the base has for sale, and the purchase price the player must pay. 10. Product Detail – Selecting a product shows more detail: G-tolerance; weight; purchase price; and a description. If the player has Targeted another Base, the sale price there will also be shown. 11. Base Detail – Passengers – When a Base is selected, this section displays Passengers desiring transport, the fare they will pay, and their destination. 12. Trade Line – When a Product is selected and a destination base is Targeted, this line shows the route from the “buy” Base to the “sell” Base. 13. Targeted Base – A Base selected as a destination. |
Notes on Using the Map
Selecting Contacts (section 1) shifts the Map into “Contact” mode. In this mode you can see the history of your messages from different contacts in the game. You can call some contacts and they may offer you special missions. (See “Scripted Story Missions” in Gameplay – Jobs Overview). When you are in Contacts mode, you back into Trade mode using the control in this same area (section 1 in the picture.)
Selecting Scarab shows TODO: what?
Selecting Service Drone sends a drone out to refuel/repair your aircraft. NOTE: This is expensive, and often not worth it unless you are carrying irreplaceable cargo or passengers.
The Trading Menu
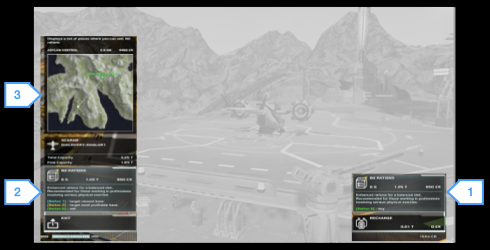
The Map, in Trade mode, is great for finding cargo or passengers you want to haul. But how do you actually buy, load, sell, and offload cargo? That’s in the in-cockpit Trading Menu accessed when your aircraft is landed at a Base cargo area:
While in your aircraft at the “buy” base, select the Loading/Refuel menu (1) via mouse or “Actions/Right.” You’ll see options to buy or dump fuel, and to buy any products the base has for purchase.
Once you land at the cargo area of the “sell” base, you can activate the Trade Menu (2) via mouse or “Actions/Left.” To get credit for the cargo, you must sell it through this interface. The game will happily allow you to “unload” the cargo via the Loading/Refuel menu, but you’ll get no credit for it!
A simplified Map (3) is also displayed when you open the Trade Menu (2). You can select it to go to the main flight planning Map/Trade screen.
NOTE: Your aircraft must be properly landed and aligned within the cargo area (airplane silhouette) for these menus to work.